Getting Windows 10 UNMOUNTABLE_BOOT_VOLUME BSOD loop at startup?
Laptop won’t start after a Windows 10 feature update. Frequently getting Unmountable Boot Volume?
You are on the right place here, this post we have different solutions to fix Unmountable Boot Volume BSOD on Windows 10.
Issue: After Windows 10 upgrade getting unmountable boot volume BSOD
I recently upgraded six client Windows 10 v1809 computers to Windows 10 v2004 via WSUS, when the computers restarted I got the BSOD error unmountable boot volume stop 0x000000.
Unmountable Boot Volume Error? The “boot volume” is the system partition of your hard drive that holds the Windows operating system. But If due to any reason when your computer can’t load Windows properly from the system partition this will result startup failure with a BSOD error “UNMOUNTABLE_BOOT_VOLUME” stop 0x000000
Unmountable Boot Volume error usually occurs due to a damaged file system or corrupted Windows files. Again Window update bug, disk drive failure, security software or faulty hardware device or incompatible device driver also cause this Windows 10 BSOD error. Whatever the reason, here some solutions you may apply to fix this Blue Screen error.
Whenever you get windows 10 Blue Screen error at startup, The first thing you have to do is disconnect all external devices such as a printer, scanner, external HDD, USB device etc ( expect keyboard&mouse) then start windows normally.Use Windows Automatic Repair
As we are unable to start access windows 10 normally, we need to access advanced options where you can get various troubleshooting tools like startup repair, safe mode, advanced command prompt and more. Lets first access advanced options and perform startup repair.
First of all boot windows from an installation media, (If you don’t have here check how to create a windows 10 bootable USB/DVD).
Let Windows start from your USB/DVD until it loads up, and click the next button.
You’ll see the Install now screen click repair your computer in the bottom-left instead.

On the following screen, select troubleshoot to get a list of advanced options.
Choose startup repair and choose the target OS, Windows 10 (or your version).
The repair will be started immediately.
Please wait patiently for the process to be finished.
Once it’s done, exit the installer and try to boot your computer normally.
Repair the Master Boot Record
The Master Boot Record (MBR) contains information about where and how your operating system is located your hard drive and helps it load properly when you turn your computer on. If this becomes corrupted, it can lead to an unmountable boot volume error.
Again access advanced options from your Windows 10 install media
Select repair your computer > troubleshoot.
This time, on the advanced options screen, choose command prompt.

Perform command below to repair MBR, rebuild BCD and fix boot manager problems
bootrec /fixmbr
bootrec /fixboot
bootrec /rebuildbcd
bootrec /scanos
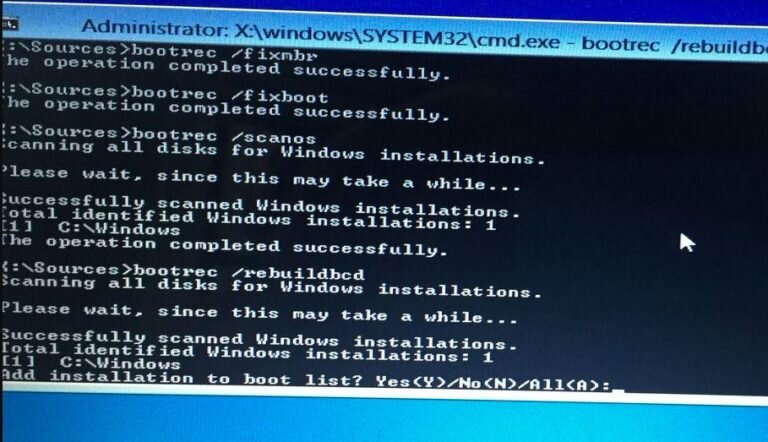
After complete these commands type exit to leave the command prompt,
Then reboot your system and check this time windows started normally
Run the Ckhdsk Command
If an automatic repair and MBR repair didn’t solve your problem, then boot into safe mode from advanced options and run Chkdsk command to check and fix disk drive errors.
When windows start on safe mode search for cmd,
Right click on the command prompt and select run as administrator.
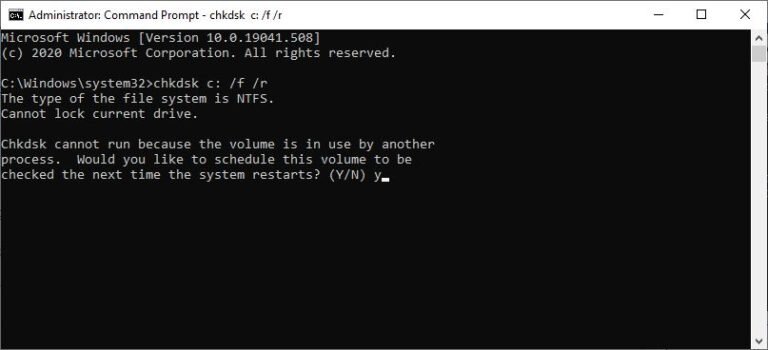
Then type command chkdsk C: /f /r
Note: Here C: is your system drive letter. The /r flag locates any bad sectors on your disk and fixes those errors and /f Fixes errors on the disk.
Chkdsk may ask you to run next time the system restarts.
If it does, enter Y for yes and reboot to start it.
This will start the scanning and repairing process for drive C:
Wait until 100% complete the scanning process
After that restart windows and check may this helps to fix the windows 10 BSOD error.
Run SFC utility and DISM command
Run system file checker its another effective solution (scan and restore missing corrupted system files ) you must apply if windows fail to fix unmountable boot volume after applying startup repair, repair BCD/MBR, check drive errors.
Again open the command prompt (admin) on safe mode
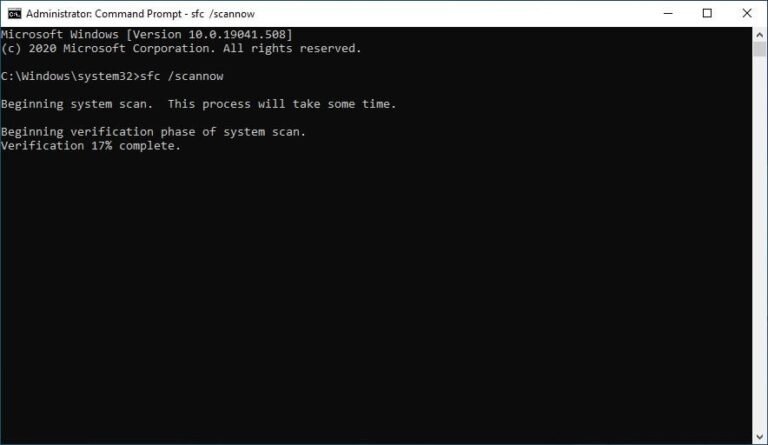
Type command sfc /scannow and hit the enter key.
This will scan for corrupted system files If found any the SFC utility will restore them from a special folder located on %WinDir%\System32\dllcache.
Wait until 100% complete the scanning process
After that restart windows and check, You never get a BSOD error if missing corrupted system files causing the issue.
If system file checker scan results windows resource protection found corrupt files but was unable to fix some of them. Then run the DISM command “dism.exe /online /cleanup-image /restorehealth” which repair the system image and allow SFC to do its job.
Run Memory Diagnostic Tool
Sometimes this Unmountable Boot Volume Blue Screen STOP: 0x000000ED can happen due to bad memory so for this try Run Memory Diagnostic Tool.
Run the Hardware and Device troubleshooter from settings -> update & Security -> Troubleshoot -> select Hardware and Device and run the Troubleshooter for check and make sure any faulty hardware device not causing the BSOD error at startup.
Also Recently installed Third-party applications to check and make sure application compatibility not causing the issue. Open Control Panel -> All Control Panel Items -> Programs and Features. Here select the recently installed Application and click uninstall Restart windows and check.
Open device manager and update/reinstall the display driver with the latest version. As users report reinstall the display driver mostly fix maximum blue screen errors on windows 10.
If the problem started for you after installing windows 10 version 1903 and applying the above these solutions didn’t fix the problem then may the windows update bug causing the issue. As Microsoft recommends Roll back windows 10 to the previous version, Defer windows update and wait for Microsoft to fix the bug and the OS get stable.
Performing the above solution didn’t fix the problem, Still, windows restart with BSOD error then its time to utilize the system restore feature, which reverts windows configuration to a previous working state without affecting any files.
Did these solutions help to resolve Unmountable Boot Volume BSOD Error?