How to fix UNMOUNTABLE_BOOT_VOLUME on Windows 10

How to fix UNMOUNTABLE_BOOT_VOLUME on Windows 10


Getting Windows 10 UNMOUNTABLE_BOOT_VOLUME BSOD loop at startup?

Laptop won’t start after a Windows 10 feature update. Frequently getting Unmountable Boot Volume?

You are on the right place here, this post we have different solutions to fix Unmountable Boot Volume BSOD on Windows 10.

Issue: After Windows 10 upgrade getting unmountable boot volume BSOD

I recently upgraded six client Windows 10 v1809 computers to Windows 10 v2004 via WSUS, when the computers restarted I got the BSOD error unmountable boot volume stop 0x000000.

Unmountable Boot Volume Error? The “boot volume” is the system partition of your hard drive that holds the Windows operating system. But If due to any reason when your computer can’t load Windows properly from the system partition this will result startup failure with a BSOD error “UNMOUNTABLE_BOOT_VOLUME” stop 0x000000

Unmountable Boot Volume error usually occurs due to a damaged file system or corrupted Windows files. Again Window update bug, disk drive failure, security software or faulty hardware device or incompatible device driver also cause this Windows 10 BSOD error. Whatever the reason, here some solutions you may apply to fix this Blue Screen error.

Whenever you get windows 10 Blue Screen error at startup, The first thing you have to do is disconnect all external devices such as a printer, scanner, external HDD, USB device etc ( expect keyboard&mouse) then start windows normally.Use Windows Automatic Repair

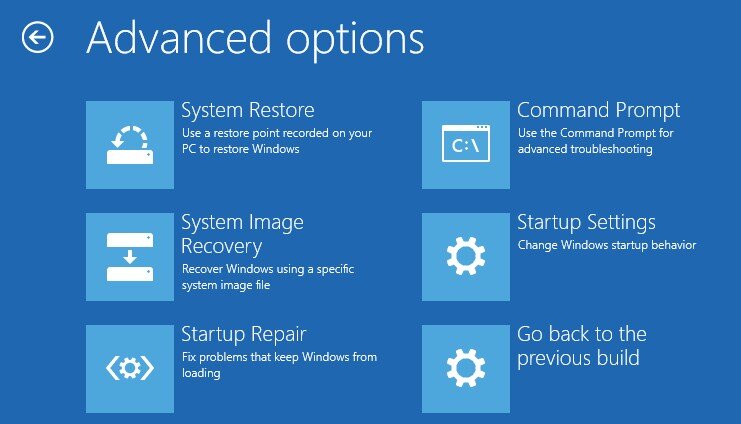
As we are unable to start access windows 10 normally, we need to access advanced options where you can get various troubleshooting tools like startup repair, safe mode, advanced command prompt and more. Lets first access advanced options and perform startup repair.

  • First of all boot windows from an installation media, (If you don’t have here check how to create a windows 10 bootable USB/DVD).

  • Let Windows start from your USB/DVD until it loads up, and click the next button.

  • You’ll see the Install now screen click repair your computer in the bottom-left instead.

windows-10-repair-your-computer.png
  • On the following screen, select troubleshoot to get a list of advanced options.

  • Choose startup repair and choose the target OS, Windows 10 (or your version).

  • The repair will be started immediately.

  • Please wait patiently for the process to be finished.

Once it’s done, exit the installer and try to boot your computer normally.

Repair the Master Boot Record

The Master Boot Record (MBR) contains information about where and how your operating system is located your hard drive and helps it load properly when you turn your computer on. If this becomes corrupted, it can lead to an unmountable boot volume error.

  • Again access advanced options from your Windows 10 install media

  • Select repair your computer > troubleshoot.

  • This time, on the advanced options screen, choose command prompt.

Windows-Advanced-Options.jpg

Perform command below to repair MBR, rebuild BCD and fix boot manager problems

  • bootrec /fixmbr

  • bootrec /fixboot

  • bootrec /rebuildbcd

  • bootrec /scanos

fix-bootrec-Errors-768x442.jpg
  • After complete these commands type exit to leave the command prompt,

  • Then reboot your system and check this time windows started normally

Run the Ckhdsk Command

If an automatic repair and MBR repair didn’t solve your problem, then boot into safe mode from advanced options and run Chkdsk command to check and fix disk drive errors.

  • When windows start on safe mode search for cmd,

  • Right click on the command prompt and select run as administrator.

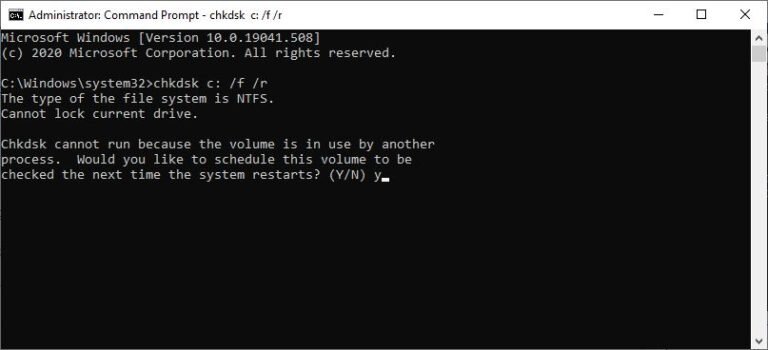
  • Then type command chkdsk C: /f /r

Note: Here C: is your system drive letter. The /r flag locates any bad sectors on your disk and fixes those errors and /f Fixes errors on the disk.

  • Chkdsk may ask you to run next time the system restarts.

  • If it does, enter Y for yes and reboot to start it.

Check-disk-utility-768x350.jpg
  • This will start the scanning and repairing process for drive C:

  • Wait until 100% complete the scanning process

  • After that restart windows and check may this helps to fix the windows 10 BSOD error.

Run SFC utility and DISM command

Run system file checker its another effective solution (scan and restore missing corrupted system files ) you must apply if windows fail to fix unmountable boot volume after applying startup repair, repair BCD/MBR, check drive errors.

  • Again open the command prompt (admin) on safe mode

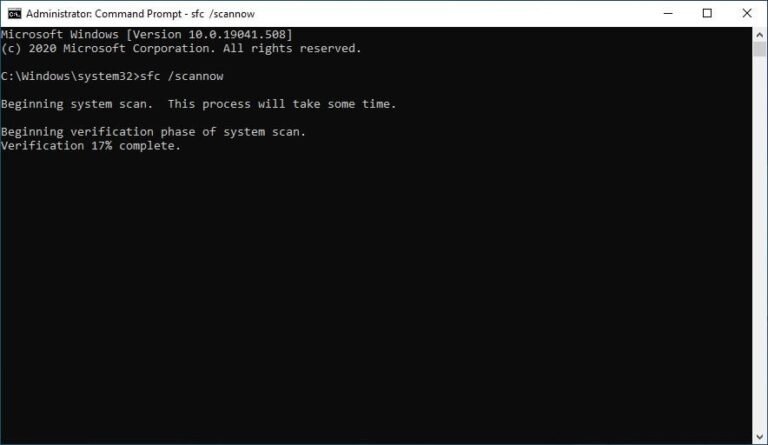
  • Type command sfc /scannow and hit the enter key.

  • This will scan for corrupted system files If found any the SFC utility will restore them from a special folder located on %WinDir%\System32\dllcache.

  • Wait until 100% complete the scanning process

  • After that restart windows and check, You never get a BSOD error if missing corrupted system files causing the issue.

Run-system-file-checker-768x445.jpg

If system file checker scan results windows resource protection found corrupt files but was unable to fix some of them. Then run the DISM command “dism.exe /online /cleanup-image /restorehealth” which repair the system image and allow SFC to do its job.

Run Memory Diagnostic Tool

Sometimes this Unmountable Boot Volume Blue Screen STOP: 0x000000ED can happen due to bad memory so for this try Run Memory Diagnostic Tool.

Run the Hardware and Device troubleshooter from settings -> update & Security -> Troubleshoot -> select Hardware and Device and run the Troubleshooter for check and make sure any faulty hardware device not causing the BSOD error at startup.

Also Recently installed Third-party applications to check and make sure application compatibility not causing the issue. Open Control Panel -> All Control Panel Items -> Programs and Features. Here select the recently installed Application and click uninstall Restart windows and check.

Open device manager and update/reinstall the display driver with the latest version. As users report reinstall the display driver mostly fix maximum blue screen errors on windows 10.

If the problem started for you after installing windows 10 version 1903 and applying the above these solutions didn’t fix the problem then may the windows update bug causing the issue. As Microsoft recommends Roll back windows 10 to the previous version, Defer windows update and wait for Microsoft to fix the bug and the OS get stable.

Performing the above solution didn’t fix the problem, Still, windows restart with BSOD error then its time to utilize the system restore feature, which reverts windows configuration to a previous working state without affecting any files.

Did these solutions help to resolve Unmountable Boot Volume BSOD Error?

Don’t risk losing your Contacts and Calendar when using IMAP in Outlook 2013, 2016, 2019, or Office 365


I’m using an IMAP account in Outlook as part of Office 365 and I noticed that various folders now have “This computer only” behind them. These folders I indeed cannot find back on the server.

This includes my Calendar and Contacts folder as well which I really cannot afford to lose.

What is the proper way to back them up?

Outlook-IMAP.PNG

In Outlook 2010, Calendar and Contact items were stored in a separate pst-file from the mail items but in Outlook 2013, 2016, 2019, and Office 365 everything is included in the single IMAP ost-file.

Actually, I should say; “everything can be included”, as it is only required to do so when you set your IMAP data file as the default in Outlook 2013 or later.

It is still perfectly possible to set things up in a separated way as it was in Outlook 2010.

Because of the different configuration options, there are various ways to make a proper backup of your data.

Note: This not only applies to Contacts and Calendar folders but to all folders which are marked with “This computer only”, including Tasks, Notes and Journal folders.

Outlook 2010 method: Separate IMAP and non-IMAP data

In Outlook 2010, setting your IMAP mailbox as the default data file wasn’t possible. As a result, you had a folder set containing all your IMAP mail folders and an additional folder set (pst-file) containing the default mail folders (usually empty) and the other default Outlook folders: Calendar, Contacts, Tasks, Notes and Journal.

If you preferred this method and would continue to work as such, you can do the following:

  1. File-> Account Settings-> Account Settings…

  2. Select the Data Files tab.

  3. Press Add…

  4. Select to create an Outlook data file (.pst).

  5. Set it as the default.

  6. Confirm the warning dialog.

  7. Restart Outlook.

  8. Move the items of the non-mail folders to their counterparts in the pst-file. To easily move your Calendar items, set the Calendar folder to a List View.

    To easily see all the local folders, it is best to use the Folder List Navigation (keyboard shortcut: CTRL+6).

  9. Go back to: File-> Account Settings-> Account Settings…-> tab Data Files

  10. Select the data file (.ost) for your IMAP account.

  11. Press: Open File Location…

  12. Close Outlook.

  13. In the Explorer window that opened in step 11, rename the ost-file to .old.

  14. Start Outlook. Your IMAP account will now resynch again but will not create the additional “This computer only” Calendar, Contacts, Tasks, etc… folders.

  15. Make sure that the newly created pst-files is included in your backup schedule.

imap-2013-pst-default-data-file.png

Set a pst-file as the default data file to make sure you don’t lose any non-synched folders (click on the image to see the view dialog).

Note: If you don’t want to re-cache your entire mailbox, you can use MFCMAPI as well to get rid of the additional “This computer only” Calendar, Contacts, Tasks, etc… folders. For detailed instructions see: Hide, move or delete an Outlook folder via MFCMAPI.

Outlook 2013, 2016, 2019, and Office 365 default: Leave things combined

The new method in Outlook 2013 and later, to contain non-mail folders within the IMAP ost-file, of course has its benefits as well. Especially when you use Outlook with a single (IMAP) account, this configuration is a welcome change as all your Outlook data is contained in a single folder list.

However, from a technical and backup perspective, this isn’t a change which should be taken lightly at all. Let me explain:

  • IMAP mail folders are being cached on the local computer in ost-files. This means that there will always exist a “master copy” of your data on the IMAP server and changes are also being replicated to the server.

  • The beauty of this is that whenever something happens to your cache, you’d simply delete the ost-file of the IMAP account (which was a pst-file in Outlook 2010 and previous) and Outlook would re-cache a fresh copy again.

  • Another benefit of this was there was no need to back up your IMAP cache when switching computers; just reconfigure the account and you are good to go again once the cache had been created.

  • By mixing locally stored data (“This computer only” folders) and cache data in a single ost-file, you cannot afford to lose the ost-file anymore either as it is no longer “just a cache”.

  • This means that you now also need to back up your IMAP cache or the “This computer only” folders and know how to restore it in case the worse happens or when you want to move to another computer.

If you decide to make backup copies of your IMAP ost-file, note that this only can be used on that computer with that specific mail account in that specific mail profile. If you were to back up your ost-file and think that you can restore it after recreating your mail account or mail profile, you sadly are mistaken and just lost your local data. You might be able to recover some data from it via a 3rd party recovery tool though.

imap-2013-ost-cannot-be-restored.png

Even if the ost-file belongs to the same IMAP mailbox, its ost-file still can’t be restored when you’ve recreated the account or mail profile.

The only supported method to create backups of the folders marked with “This computer only” is by exporting them to a pst-file via;

  • File-> Open & Export-> Import/Export-> Export to a file-> Outlook Data File (.pst).

While you could export your entire IMAP mailbox to a pst-file, you can also choose to export only the local folders. In that case, you’ll have to repeat the export process for each folder tree which is marked with “This computer only” but you can choose to export it to the same pst-file.

Recover Calendar and Contacts from an IMAP ost-file

As mentioned earlier, you can’t restore an ost-file of an IMAP on another computer or after reconfiguring your account on your current computer and you’ll need a 3rd party recovery tool if you still need to extract your Calendar or Contacts data.

There are various tools out there which claim to be able to do this but not all of them are legit. Trustworthy tools which I’ve used before are:

  • Kernel for OST to PST Conversion

  • Stellar Converter for OST

  • DataNumen Exchange RecoveryList View

Most of them only discuss Exchange based ost-files but they can be used for ost-file created by IMAP accounts as well.

Personal thoughts

While it is great that IMAP accounts can now also be set as the default data store in Outlook, to me, the backup concerns regarding non-mail folders outweigh all its possible benefits.

If you only use the mail folders of your IMAP accounts and don’t use any of the other folders, then the new method in Outlook 2013 and later is an improvement.

In all other cases, and when you care about your data, I would continue to use the Outlook 2010 method in Outlook 2013, 2016, 2019, and Office 365 as well.

Restore a deleted OneDrive

Restore a deleted OneDrive


When you delete a user in the Microsoft 365 admin center (or when a user is removed through Active Directory synchronization), the user's OneDrive will be retained for the number of days you specify in the OneDrive admin center. (For info, see Set the default file retention for deleted OneDrive users.) The default is 30 days. During this time, shared content can still be accessed by other users. At the end of the time, the OneDrive will be in a deleted state for 93 days and can only be restored by a global or SharePoint admin.

For info about using Files Restore to restore a OneDrive to a previous point in time, see Restore your OneDrive.

For info about restoring items from the recycle bin in OneDrive, see Restore deleted files or folders.

Restore a deleted OneDrive when the deleted user no longer appears in the Microsoft 365 admin center

If the user was deleted within 30 days, you can restore the user and all their data from the Microsoft 365 admin center. To learn how, see Restore a user in Microsoft 365. If you deleted the user more than 30 days ago, the user will no longer appear in the Microsoft 365 admin center, and you'll need to use PowerShell to restore the OneDrive.

  1. Download the latest SharePoint Online Management Shell.

    Note

    If you installed a previous version of the SharePoint Online Management Shell, go to Add or remove programs and uninstall "SharePoint Online Management Shell."

    On the Download Center page, select your language and then click the Download button. You'll be asked to choose between downloading a x64 and x86 .msi file. Download the x64 file if you're running the 64-bit version of Windows or the x86 file if you're running the 32-bit version. If you don't know, see Which version of Windows operating system am I running?. After the file downloads, run it and follow the steps in the Setup Wizard.

  2. Connect to SharePoint as a global admin or SharePoint admin in Microsoft 365. To learn how, see Getting started with SharePoint Online Management Shell.

  3. Determine if the OneDrive is available for restore

If you know the URL of the OneDrive, run the following command:

PowerShell

Get-SPODeletedSite -Identity <URL>

A user's OneDrive URL is based on their username. For example,

https://microsoft-my.sharepoint.com/personal/user1_contoso_com. You can find their username on the Active users (or Deleted users) page in the Microsoft 365 admin center.

If you don't know the URL of the deleted OneDrive, run the following command:

PowerShell

Get-SPODeletedSite -IncludeOnlyPersonalSite | FT url

If the OneDrive appears in the results, it can be restored.

  1. Restore the OneDrive to an active state:

PowerShell

Restore-SPODeletedSite -Identity <URL>

  1. Assign an administrator to the OneDrive to access the needed data:

PowerShell

Set-SPOUser -Site <URL> -LoginName <UPNofDesiredAdmin> -IsSiteCollectionAdmin $True

For more info about these cmdlets, see Get-SPODeletedSite and Restore-SPODeletedSite.

Permanently delete a OneDrive

After you recover the data you need from the OneDrive, we recommend that you permanently delete the OneDrive by running the following command:

PowerShell

Remove-SPOSite -Identity <URL>

Remove-SPODeletedSite -Identity <URL>

Caution

When you permanently delete a OneDrive, you will not be able to restore it.

Windows 10 in S mode: Pros and cons

Windows 10 in S mode: Pros and cons


S mode is a Windows 10 feature that improves security and boosts performance, but at a significant cost. Find out if Windows 10 in S mode is right for your needs.

windows-10-s.jpg

In 2017, Microsoft added a new feature to its Windows 10 operating system: S mode, a stripped-down, tightly-locked, and low-end PC friendly way to run Windows 10. There are a lot of good reasons to put a Windows 10 PC in S mode, including:

  • It's more secure because it only allows apps to be installed from the Windows Store;

  • It's streamlined to eliminate RAM and CPU use; and

  • Everything a user does in it is automatically saved to OneDrive to free up local storage.

If that sounds like another OS you're familiar with, you're not wrong--it's a lot like Google's ChromeOS for its Chromebooks. Microsoft even made Windows 10 in S mode to run on ARM processors, so it's intentionally designed to work well on hardware that wouldn't normally run Windows 10 very smoothly.

Performance and security improvements always come at a cost though, and Windows 10 in S mode is no different. If you're considering a new Windows 10 PC, especially a Surface device (these often ship with Windows 10 in S mode standard), be sure you know what you're getting yourself into before meeting with disappointing surprises.

Pro: Windows 10 in S mode is more secure

There's one major reason why Windows 10 in S mode is more secure: You can only install apps from the Microsoft Store. Think of it like the Chrome OS Web Store, iOS App Store, or Google Play--you have to go to one of those locations to get apps for your device, which means Apple, Google, or Microsoft has vetted it for safety and performance.

Microsoft also restricts antivirus software to its own built-in Windows Defender Security Center, and has stated in its Windows 10 S FAQ that "the only antivirus software known to be compatible with Windows 10 in S mode is the version that comes with it." 

Like other OSs managed top to bottom by the manufacturer, it's interoperability is its strength when it comes to keeping you safe.

Con: Security comes at the cost of usability

The resilience of Windows 10 in S mode comes with several drawbacks.

As mentioned above, you can only install apps from the Microsoft Store. That may not seem like a big deal at first (because surely the apps you need will be in the Microsoft Store), but there are a lot of things professional users need that are downloaded from the web or installed using other app management platforms. 

S mode means no Adobe software, no Apple apps, no non-Microsoft video conferencing apps, and no third-party security software--in short, if it comes to a Windows PC via a third party it doesn't come to S mode at all.

That includes web browsers and that's a deal killer for many people. S mode users are stuck with Edge as their browser and Bing as their default search engine. To further restrict browsing matters, even if Chrome or Firefox were installed on an S mode computer (neither are available in the Microsoft Store) it couldn't be set as the default browser, nor can the default search engine be changed. 

Pro: Windows 10 in S mode is ideal for large-scale enterprise and education deployments

In offering S mode, Microsoft is trying to compete for two markets, both of which are currently dominated by Chromebooks: Students and large enterprises with lots of machines to manage.

Schools and businesses have hardware needs in common--they need to deploy a lot of machines to a lot of people, they need them locked down so users don't get infected with malware or lose a machine filled with sensitive data, and they need them to be cheap.

S mode was built to address those needs, all while being a familiar interface that most computer users have worked with at least once in their lives. Windows 10 S mode looks and feels no different than using Windows 10 home, Pro, or Enterprise, but it allows administrators to keep a short leash on users. 

Windows 10 in S mode is also built to run on far lower end PCs, without bogging down their hardware, meaning a simple PC deployment for a user that only needs access to Office apps and a web browser can be more affordable for businesses and schools than ever before, and is perfect for business and education users.

Pro: It's easy to switch to a full version of Windows 10

If you bought a Windows 10 PC with S mode installed, you may have been surprised by what you couldn't do. Don't be dismayed--you aren't stuck with S mode. In fact, you can switch out of S mode at any time. 

To switch from S mode to the full version of Windows 10 hiding behind it, navigate to Settings | Update And Security | Activation. In the Activation menu, look for Switch To Windows 10 Pro (or Home--you'll see one of the two depending on what version of Windows 10 your computer has). 

Clicking Switch will open the Microsoft Store and prompt you to "Get" the full version, akin to installing an app. Once you do that, your PC will switch over to its full version of Windows 10 and you'll be free to install whatever apps you wish.

Be forewarned: Switching out of S mode is a one-way street. Once you turn S mode off, you can't go back, which could be bad news for someone with a low-end PC that doesn't run a full version of Windows 10 very well.

The other trade-off to deactivating Windows 10 S mode is that you're taking security into your own hands, and without installation restrictions, it's much easier to find yourself infected with malware. As always, be sure you double-check that switching to the full version of Windows 10 is necessary for your needs and look online to find out if your computer meets hardware requirements to run the full version.

How to upgrade Windows Server 2012 R2 or Windows Server 2016 evaluation to the full version


I installed a new Microsoft server using an evaluation iso and now I would like to convert this server to the full version. This article will provide step-by-step guide for this easy procedure.

In order to complete this instruction you must have the following:

Windows Server installed using server evaluation iso.

Valid and legal Windows Server key

The upgrade steps are the following

  1. Login to the server console you want to convert to the full retail version.

  2. Verify that this server is running an evaluation version. To do this, do either of the following:

    • Easy – Hit the Windows Key and type in System and select Settings from search or…

    • GUI – Graphical User Interface – From the Start screen, open Control Panel. Open System and Security, and then System. View Windows activation status in the Windows activation area of the System page. Click View details in Windows activation for more information about your Windows activation status.

    • CUI – Character User Interface – From an elevated command prompt, run slmgr.vbs /dlv; evaluation versions will include “EVAL” in the output.

Windows Server 2012 R2 Evaluation

3. From an elevated command prompt do the following:

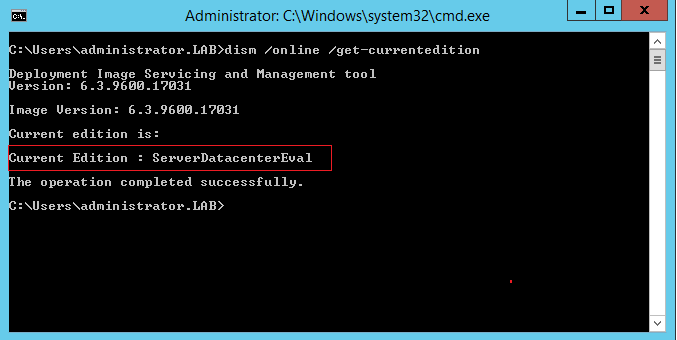
  • Determine the current edition name with the command DISM /online /Get-CurrentEdition.

From an elevated command prompt.png

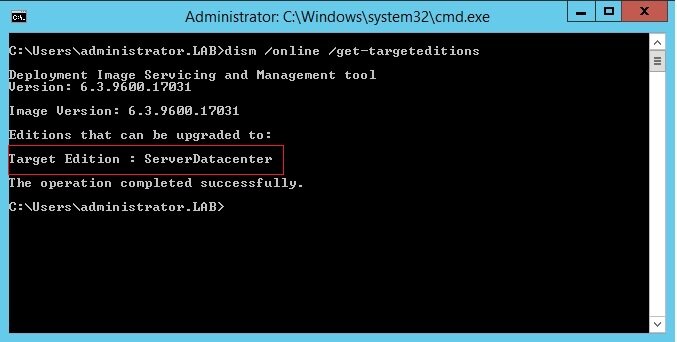
4. Determine the possible Target edition name with the command DISM /online /Get-TargetEditions.

w12_3.jpg

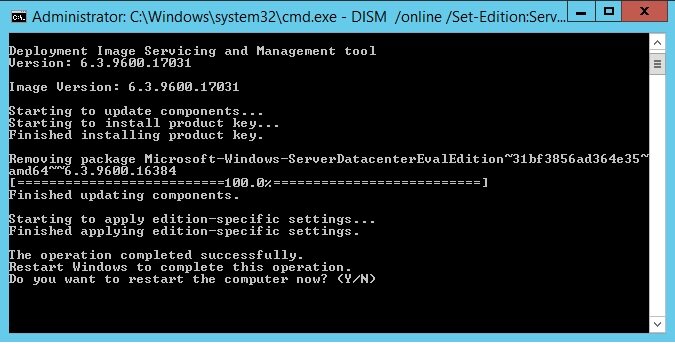
5. Then run DISM /online /Set-Edition:<edition ID> /ProductKey:XXXXX-XXXXX-XXXXX-XXXXX-XXXXX /AcceptEula, where the edition ID is the edition you wnat to your server convert to and a retail product key is your valid server key. The server will restart twice.

w12_5.jpg
w12_6.jpg

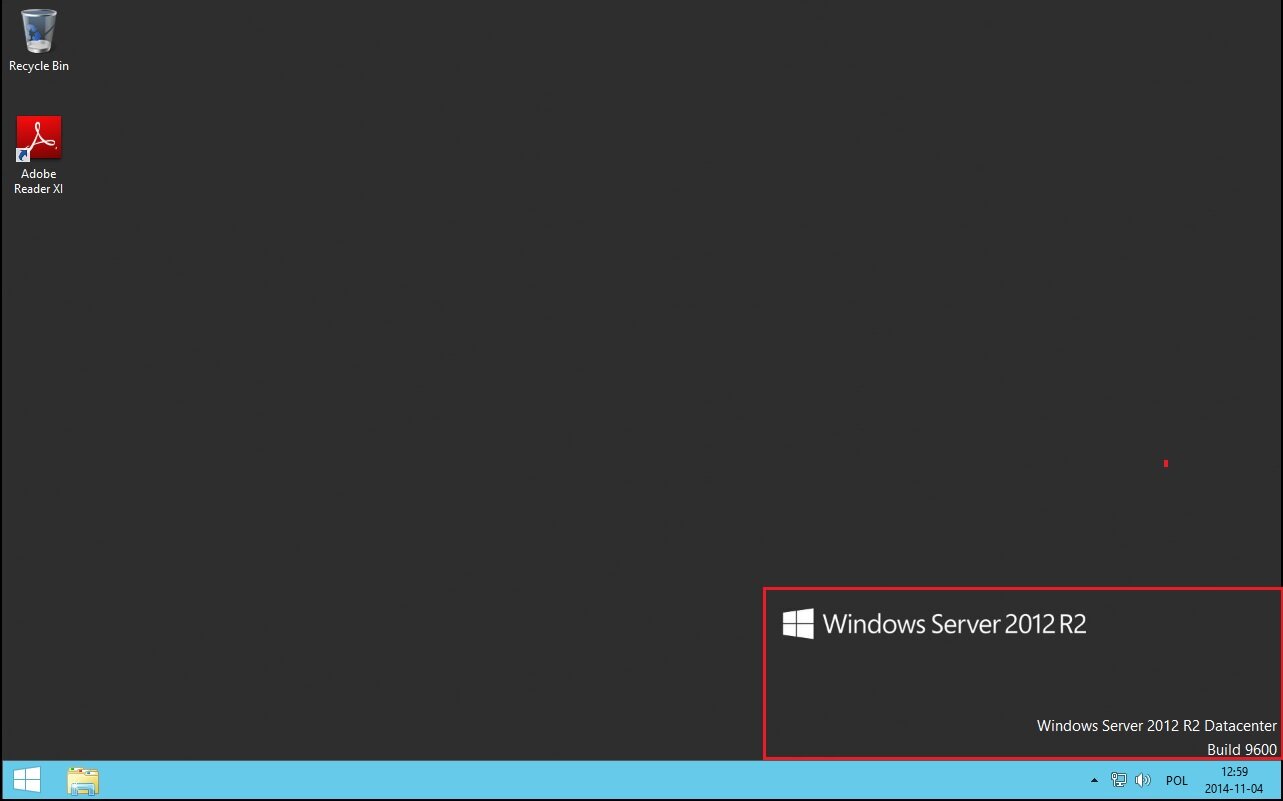
6. Verify the current server edition – use preferred method from step 1. 

  • I hope you will find this post useful

Safe Mode in Windows 8 and Windows 8.1

Safe Mode in Windows 8 and Windows 8.1


Safe Mode in Windows 8 and Windows 8.1 is not too different from the Safe Mode found in earlier versions of Windows.

Image.png

The operating system still loads only the most basic drivers and services, so that it can display a minimal useful interface. The only important difference is that the minimum screen resolution used by Safe Mode has risen from 800x600 pixels to 1024x768 pixels.

1. Use the System Configuration Tool (msconfig.exe) - works in Windows 8 & 8.1

The easiest method for booting into Safe Mode is to use the System Configuration tool, also known as msconfig.exe.

Go to the Boot tab and, in the Boot options section check the box that says "Safe boot". Then, click or tap OK.

Image.png

You are informed that you need to restart your computer. Click Restart or Exit without restart depending on whether you want to restart now or later.

Image.png

At the next restart, Windows 8 and Windows 8.1 start in Safe Mode.

2. Use Shift + Restart - works in Windows 8 & 8.1

Another method is to press the Power button at the Windows login screen or in the Settings charm. Then, press and hold the SHIFT key on your keyboard and click Restart.

Image.png

Windows asks you to choose an option. Press Troubleshoot.

Image.png

In the Troubleshoot screen, press Advanced options.

Image.png

In the Advanced options screen, press Startup Settings.

Image.png

You are informed that you are about to restart in order to change several Windows options, including enabling Safe Mode. Press Restart.

Image.png

Your computer or device restarts again and displays nine startup settings, including Safe Mode, Safe Mode with Networking and Safe Mode with Command Prompt

Image.png

Press the F4 key on your keyboard, to enable Safe Mode, F5 to enable Safe Mode with Networking and F6 to enable Safe Mode with Command Prompt. Windows 8 and Windows 8.1 now boot according to the setting you selected.

3. Boot from a System Recovery CD/DVD - works only in Windows 8

In Windows 8, but not in Windows 8.1, you can create a system recovery CD or DVD. Here's the tutorial that shows how it is done: How to Create a System Repair Disc for Windows 7 & Windows 8.

Once you have that disc created, boot from it. When asked to press any key to load its content, do so.

First, you are asked to choose your keyboard layout. Press the layout you want to use. If you want to browse through the available options, press "See more keyboard layouts" until you find the one you want to use.

Image.png

Then, the Choose an option screen is shown.

Image.png

From here on, the steps are identical to those shown for method 2.

4. Boot from a System Recovery Memory Stick - works in Windows 8 & 8.1

In Windows 8 and Windows 8.1 you can use the Recovery Media Creator to create a system recovery drive on a USB flash Drive. Details instructions can be found in this tutorial: How to Create a Recovery Drive on a USB Memory Stick in Windows 8 & 8.1".

Boot from the USB memory stick and follow the same instructions as in method 3.

5. Use F8 or Shift + F8 (doesn't work when using UEFI BIOS & SSDs)

In Windows 7, you were able to press F8 just before Windows got loaded, to open the Advanced Boot Options window, where you could choose to start Windows 7 in Safe Mode.

Some websites advise you to press Shift+F8, just before Windows 8 or 8.1 starts loading so that you make it start the recovery mode, from where you can boot into Safe Mode. The problem is that, most times, Shift+F8 and F8 don't work, even though they are correct commands, supported by Windows 8 and Windows 8.1.

This official blog post from Microsoft (Designing for PCs that boot faster than ever before) explains that this behavior is caused by their work in designing a very fast boot procedure. Both Windows 8 and Windows 8.1 have the fastest boot times ever. To quote Steve Sinofsky:

"Windows 8 has a problem – it really can boot up too quickly. So quickly, in fact, that there is no longer time for anything to interrupt boot. When you turn on a Windows 8 PC, there's no longer long enough to detect keystrokes like F2 or F8, much less time to read a message such as "Press F2 for Setup." For the first time in decades, you will no longer be able to interrupt boot and tell your PC to do anything different than what it was already expecting to do."

If you have modern PC with a UEFI BIOS and a fast SSD drive, there's no way you can interrupt the boot procedure with your keypresses. On older PCs, with a classic BIOS and no SSD drive, pressing these keys might still work though.